Learn how to successfully root Boost Mobile Galaxy J7 SM-J7008 & Virgin Mobile Galaxy SM-J700P from this post. If you own one of the said super phones. You are invited to learn on rooting it.
Boost Mobile Galaxy J7 variant SM-J7008 and Virgin Mobile’s Galaxy SM-J700P are great phones it's shame if there was no working root method available. That was old days.
Because now it's a different story, thanks to the XDA developer namely Messi2050 that has managed to find root method wrapped in the CF-Auto-Root.
Advertisements.
Using the CF-Auto-Root from Messi2050 then you can get root access on both Virgin or Boost mobile based Samsung Galaxy J7.
CF-Auto-Root is the most easy and successful rooting method with computer to root most of Samsung Galaxy flagships now days.
Since we use CF-Auto-Root then we will need Odin's participation to be flashing tool and a Windows based computer.
If you are interested then you can read on to find out the whole process on rooting Boost Mobile Galaxy J7 variant SM-J7008 and Virgin Mobile’s Galaxy SM-J700P.
But firstly I recommend you to peruse the following preconditions section.
Preconditions.
- Behold the instructions here only for Boost Mobile Galaxy J7 variant SM-J7008 and Virgin Mobile’s Galaxy SM-J700P only.
- Please to firstly backup any of data you regard as precious data.
- A Windows PC with USB drivers installed and a USB cable to connect your device to PC.
- It's recommended to temporarily disable your Antivirus and Samsung KIES programs because these software will interrupt Odin from starting.
- Be sure to enable Android USB debugging mode first.
Note. Follow the update steps on this post but all the risks are yours to bear. Keep that in mind oke?Download and then unzip these files to the computer of yours.
How to root Boost Mobile Galaxy J7 variant SM-J7008 and Virgin Mobile’s Galaxy SM-J700P
- First thing first is entering Download Mode. Methods to enter to that mode is by powering off your device. Then press and hold these three buttons at the same time; Volume Down + Home + Power.
- A warning message will then appear on your screen while pressing the three buttons if that's so, just release the three buttons and then replace them with pressing Volume Up to confirm accessing the download mode.
- While your device inside the Download Mode. Then leave your device. Now go to your PC to find and launch Odin. Once you've found it. Double-click on the Odin to launch the tool. Odin will be used to detect your device and flash the CF-Auto-Root package to your Samsung Galaxy J7.
- After Odin is opened, use your USB cable to connect your device to computer, for Odin to detecting your device.
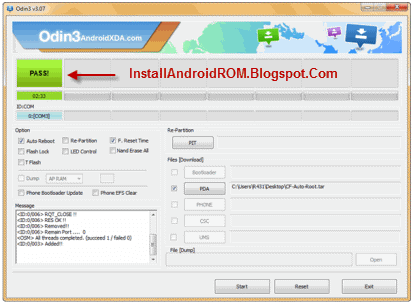
- If your device's detected, Odin will show a notification says Added!!!.
- In this phase you need to find the CF-Auto-Root package stored on your PC, so to do so just click AP (For Odin3 v3.09 or newer) or PDA (For Odin3 v3.07) button. Then browse your computer to search where is the CF-Auto-Root package you previously saved on your computer. I suggest put it on easy place to find like Desktop.
- Once the CF-Auto-Root package is found then click the Start button to command Odin to install the CF-Auto-Root package.
- Wait not till you see PASS notification on Odin interface indicating that the rooting package was successfully flashed.
- On this phase you are recommended to reboot your Samsung Galaxy J7 device in order to complete the flashing procedures.
Advertisements.
Fix bootloop and other errors.Awesome my friend! You have successfully root your Boost Mobile Galaxy J7 SM-J7008 & Virgin Mobile Galaxy SM-J700P. Enjoy the root!
In case of this issue then you are recommended to perform a factory reset by simply entering the Recovery Mode and then perform wipe data/factory data.


comment 0 comments:
more_vertsentiment_satisfied Emoticon