Advertisements.
However if you have not yet getting any software update neither via OTA nor KIES, then you can proceed to the manual installation of the T805WVLU1BOD6 Android 5.0.2 firmware by following the instructions written on this post. And you will then have your Galaxy Tab S powered with this software.
We will be using Odin tool to flash the firmware software on your phone. Want to flash it manually? Please to firstly reading the preconditions below first.
Preconditions.
- T805WVLU1BOD6 (VLU1BOD6) firmware is for Samsung Galaxy Tab S 10.5 LTE (SM-T805W). Do not try it on any other models.
- For a rooted Samsung Galaxy Tab, then you will lose your root access once this firmware is installed.
- If you have either CWM or TWRP recovery then it will be replaced with a stock recovery.
- Samsung KIES will continue detecting your tablet.
- If your device is running a custom ROM the firmware will remove the ROM system memory partition.
- Do not forget to enable USB debugging mode for Samsung Galaxy Tab S 10.5 LTE (SM-T805W)!
- And your battery should have enough power.
- Odin will be used as a flashing tool.
- Also to temporarily disable both of your antivirus software or KIES installed on your PC.
- A computer Windows, a USB cable and have installed a USB Drivers.
- Perform backups first, do not continue without making backups first. Remember that guys!
Advertisements.
Files needed.
- Canada (Videotron) T805WVLU1BOD6_T805WOYA1BOD6_VTR.
- Download Odin3 v3-07,
Instructions to install T805WVLU1BOD6 (VLU1BOD6) Android 5.0.2 firmware on Samsung Galaxy Tab S 10.5 LTE (SM-T805W)
- Turn off your tablet completely.
- Enter the Download Mode using the Volume Down + Home + Power.
- When you see a warning message, use Volume Up button to enter the mode.
- Launch Odin now by clicking the exe file you saved previously on your computer.
- Now use your USB cable to connect your tablet to computer.
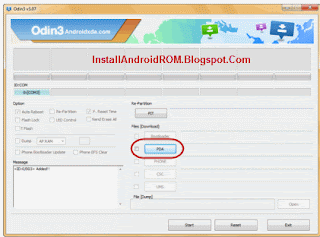
- Odin will try to recognize it, a message saying Added!!! will then appear indicating that Odin has recognized your device.
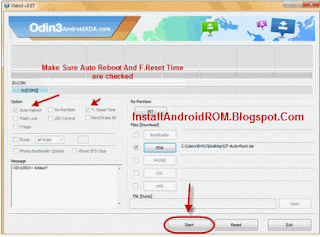
- Tap the AP (For Odin3 v3.09) or PDA (For Odin3 v3.07) button then search the firmware update you previously extracted to your computer.
- Now let's finish the process by hitting Start button on Odin. Beforehand be sure the Auto Reboot and F.Reset Time options are checked.
- Odin will start the installation. Just wait the process could take minutes. Just be patient and do nothing.
- When the entire flashing phases are done. You will see a PASS message from Odin. That means the firmware was successfully installed on your phone.
- Great job guys.
%2BSM-T805W.gif)


comment 0 comments:
more_vertsentiment_satisfied Emoticon