Learn how to root Android using Chainfire (CF-Auto-Root) and Odin to bring root access to your beloved smartphone or tablet. The procedures are simple and easy.
Those who have an Android powered smartphone or tablet are familiar with a term called Root. Root simply means owing a privileged account system to access all the vulnerable and essential areas of your device.
If you have a root access then you are the master of your Android device, you can perform many restricted actions for regular users like accessing, executing or altering all files, commands and systems on core areas on your Android device.
Once your device's rooted then you have privilege right and your level is lifted up from a regular user to be a superuser / privileged user. With that level in hand, you are capable to run and execute commands that are forbidden from doing by regular users (unprivileged user).
Advertisements.
I have discussed about what rooting is on the previous post. So I don't need to repeat the topic again on this post. But if you feel you haven't been taught enough and are eager to learn more about it, please proceed to what is root Android post.
Today we will focus on the topic that is already described clearly on title which is how to root Android using Chainfire and Odin.
If your device's supported by Chainfire then you can root it using the tool. And the supported device I am talking about are from Samsung Galaxy flagship. Because we will utilize the Odin's service to flash the Chainfire Auto Root package.
Guides to install TWRP recovery using Odin.
Odin only supports Samsung flagships nothing else. Therefore to deliver root access to your Samsung Galaxy please continue. Read the preconditions.
Preconditions.
- Rooting can nullify your device's warranty and KNOX.
- Rooting can potentially harm your device -- albeit it's a rare case.
- Neither Samsung nor your mobile network will stop giving you a free of charge service if your device's rooted.
- Make necessary backups over your existing precious data.
- A working Windows computer with USB drivers installed and also a USB cable.
- Be sure to temporarily disable your Antivirus and Samsung KIES software, only for temporarily once the rooting process done, re-enable them because these kind of software could interrupt Odin from running.
- Be sure to have enabled your Android USB debugging mode to bridge connection between your device and computer. Learn to enable Android USB debugging mode.
Note. Perform the rooting instructions on this post. But all the potential risks during or after performing the instructions are yours to bear. Blame none except yourself if that really happen.
How to root Android using Chainfire and Odin
Remember that regarding Odin file and CF Auto Root versions can be various depending on your device models. What you need is finding the right Odin or CF-Auto-Root version and then follow the instructions on this post.Files you need.
Instructions.
- We need to boot into the Download Mode. Do so by powering off your device. Then press and hold these keys simultaneously; Volume Down + Home + Power.
- Doing so will call a warning message showing up on your screen like in the following picture. What you need to do now, release the keys you're pressing and change them with pressing Volume Up in order to continue entering the Download Mode.
- Once your device's inside the Download Mode. Go to your computer to open Odin you previously saved to your computer. Double-click on it to make it open.
- Once Odin has been opened on your PC. You need to connect your Android smartphone / tablet to computer using a USB cable.
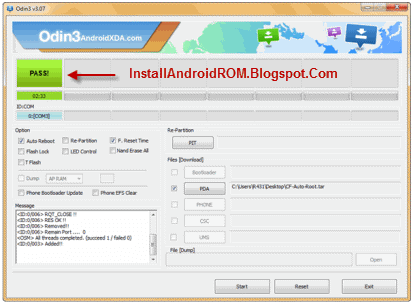
- After you've connected your device to computer. Odin will try detecting your device. If it manages to detect it, you will see a notification saying Added!!!.
- Great now you need to find the saved CF-Auto-Root package you downloaded to PC, do so by clicking AP (For Odin3 v3.09 or newer) or PDA (For Odin3 v3.07) button. And then browse to find the CF-Auto-Root package inside your PC.
- Click the Start button to tell Odin to begin the flashing process. Odin will then install the CF-Auto-Root package. Just wait now.
- Once the process is complete. You will be seeing PASS notification from Odin interface. That means the flashing process was done and CF-Auto-Root package is installed successfully. Your device is rooted.
- Now you need to reboot your Android powered device to complete all the processes and load the packages to root your Android device.
Advertisements.
Well done my friend because you just learnt how to root your Android powered device using Chainfire Auto Root and Odin. You can now perform rooting anytime you desire. Hope this post helped you.


comment 0 comments:
more_vertsentiment_satisfied Emoticon