Advertisements.
Once your Samsung Galaxy J7 is powered with TWRP recovery then you can do things like rooting your device, deleting bloatware, installing zip based files, flashing custom kernels, upgrading to the available custom ROMs, overclocking your device, and last but not least you can also making Nandroid backups that will create a mirror for your entire content.
However those kind of activities are not approved by Samsung itself, some of them could even nullify your device's warranty, thus make sure you know that once your device is rooted (For example) then your warranty will also be gone as well. And TWRP recovery is not Samsung produced software, it's the result of the creativity from third-party Android developers that want more rather than a stock recovery is offering.
Believe me having a custom recovery image installed is fun. It can also be replaced with a stock recovery brought by the official firmware released by Samsung in the regular update circles. If that's the case you need to start from the beginning, re-install the custom recovery and then root your beloved device.
Advertisements.
Since this is not Samsung made software, therefore things like bricking or such may happen, you know thus if that's really happening then you are the one should be held responsible and do not blame anyone except yourself. If you are interested then you are invited and welcomed to read the full instructions to install TWRP recovery on Samsung Galaxy J7 of yours.
Preconditions.
- Make a necessary backup to your existing data.
How to install TWRP recovery on Samsung Galaxy J7
Download and unzip these files to your beloved PC.
Instructions.
- Power off your Samsung Galaxy J7 to boot into the Download Mode, then press these three buttons; Volume Down + Home + Power.
- When a Warning appear, just release those three buttons, then press Volume Up , you are in the Download mode now.
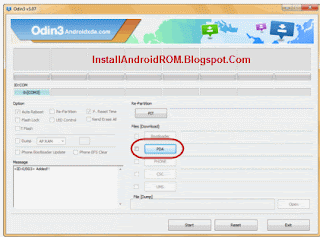
- Open Odin from your PC.
- Plug your device to USB cable then to your PC.
- Added!!! on the message box on Odin indicating that your phone is detected.
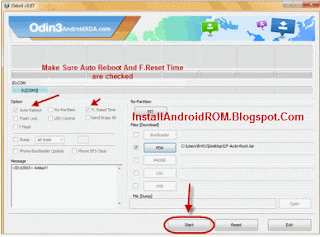
- Click the AP (For Odin3 v3.09 or newer) or tap the PDA (For Odin3 v3.07) button to get the recovery file on your PC.
- Click the Start button for Odin to flash the recovery file to your Samsung Galaxy J7.
- PASS notification will appear showing you that TWRP recovery has been successfully flashed to your Android based smartphone.
- Reboot your Samsung Galaxy J7 now guys.


comment 0 comments:
more_vertsentiment_satisfied Emoticon