Advertisements.
Whatever your intention might be, you will find the complete how to instructions to deliver root function to your system so you can further tweak it by installing great applications and ROMs to boost up its performance. And remember, Samsung doesn't approve this kind of activity, as the company regard rooting will give you and anyone else an access to the area they think should be closed for average users.
So perform the instructions here at your own risk, if your phone get damaged, bricked or end up bootlooping then all the risks are yours to take.
Preconditions.
- Please to firstly make necessary backups before proceeding to the instructions below.
- Prepare your Windows OS based computer, a USB cable, USB driver.
- Enable you Samsung Galaxy S5 Mini USB debugging mode first to build connection between your phone and your PC.
- Samsung will deny your warranty once your device's rooted, therefore no free service you will get if you need a technical repairmen in the future.
- Good luck and do not skip anything.
- Download CF-Auto-Root-kminilte-kminilteub-smg800m.zip.
- Download Odin3 v3-09 (If you've downloaded then no need to re-download it).
Install G800MUBU1AOG1 Android 4.4.2 On Galaxy S5 Mini SM-G800M.
How to root G800MUBU1AOG1 Android 4.4.2 KitKat on Samsung Galaxy S5 Mini SM-G800M
- You need to enter to the Download Mode now. Power off your phone, then press and hold these buttons; Volume Down + Home + Power.
- When you see a warning like in the following image, just release the buttons, then use Volume Up to access the download mode.
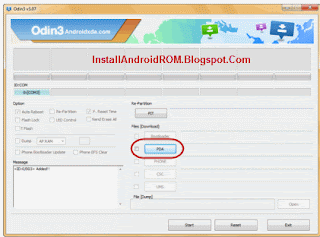
- Launch Odin from your computer.
- When your phone's in download mode, and Odin is launched, then connect your phone to PC using the USB cable.
- Odin will then try to recognize your phone, Added!!! notification will appear indicating that your phone's detected.
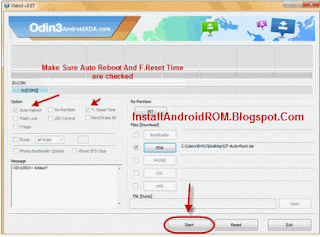
- Click on AP (For Odin3 v3.09 or newer) or click the PDA (For Odin3 v3.07) button, then search the .tar.md5 based firmware file on your computer.
- Once the firmware file found, then click the Start button to begin the flashing process.
- PASS notification will show up meaning the flashing process was successful.
- Restart your beloved phone now.


comment 0 comments:
more_vertsentiment_satisfied Emoticon