Advertisements.
Rooting is a safe action, albeit most of the device manufacturers don't approve it including Samsung, therefore the Korean company will stop giving your free services once your device's rooted because it at the same time voiding your device's warranty. But no worry you can restore or flash a stock firmware to get back your warranty.
And in this post Install Android ROM brings you the best solutions to bring root access for all the N900W8VLU2DOD1 stock firmware powered Samsung Galaxy Note 3 SM-N900W8. So be sure you prepare everything needed. And if this the first time you root your device, please to read the following preconditions section, do it guys.
Preconditions.
- Make sure your Galaxy Note 3 is running on N900W8VLU2DOD1 Android 5.0 stock firmware (Update to N900W8VLU2DOD1 Android 5.0 firmware).
- Make sure your device is Samsung Galaxy Note 3 SM-N900W8 (hltecan).
- Please enable your Samsung Galaxy Note 3 SM-N900W8's USB debugging mode beforehand.
- Prepare your computer based Windows (USB cable too) because we will use Odin.
- Be sure you make necessary backups before doing anything else.
- Your batter power should be at least 50 or 70 percent power.
Advertisements.
Do it at your own risk, blame none but yourself, for any bricks or damages that may happen during or after the rooting process.Now download all the files to your existing computer.
- Download CF-Auto-Root-hltecan-hlteub-smn900w8.zip.
- Download Odin3 v3-09 (If this version is already downloaded to your PC so no need to download it again).
How to root root N900W8VLU2DOD1 Android 5.0 stock firmware on Samsung Galaxy Note 3 SM-N900W8
- Power off your Note 3 now to boot into the Download Mode, when your device's turned off, press these three buttons; Volume Down + Home + Power.
- When you see a warning like in the picture, release the buttons, then press Volume Up to get into to the download mode.
- If your phoneblet is in download mode, just open Odin from your PC.
- Grab your USB cable then plug it to your phone and then your computer's USB port.
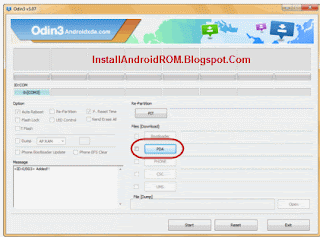
- Odin will try to recognize your phone, if it does recognize it, you will see Added!!! notification shows up on message box.
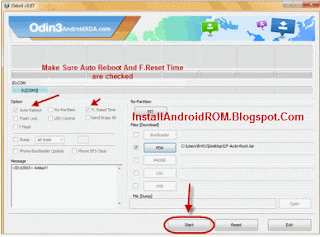
- Click on AP (For Odin3 v3.09 or newer) or click the PDA (For Odin3 v3.07) button, now find the rooting package; CF-Auto-Root-hltecan-hlteub-smn900w8.tar.md5.
- Now click Start button to begin the rooting process.
- PASS notification will show up if the rooting process is successful.
- Restart your phoneblet.


comment 0 comments:
more_vertsentiment_satisfied Emoticon