Advertisements.
However if you have not yet received any notifications neither through OTA or Samsung KIES, then you are welcomed to follow the full and manual instructions to install G800FXXU1AOG2 Android 4.4.2 KitKat firmware on Samsung Galaxy S5 Mini SM-G8OOF phone. And the procedures are the same like installing any other firmware released by Samsung, we will use Odin and Windows based computer.
Preconditions.
- Remember that to install G800FXXU1AOG2 Android 4.4.2 KitKat only on Samsung Galaxy S5 Mini SM-G800F phone only.
- Your rooted access will be wiped out as your phone's kernel will be restored.
- Your custom recovery image will be taken down and replaced with a stock recovery image.
- Your custom ROM's system partition will be deleted.
- Backup your phone, do not skip this one, remember that guys.
- A working Windows computer, a USB cable, and already upgraded USB drivers originally from Samsung.
- Do not forget to enable USB debugging mode of your Android.
Advertisements.
Files needed to be downloaded to your PC.
- Germany G800FXXU1AOG2_G800FDBT1AOG1_DBT.
- Nordic Countries G800FXXU1AOG2_G800FNEE1AOG2_NEE.
- Russia G800FXXU1AOG2_G800FSER1AOG2_SER.
- Download Odin3 v3-09 (No need to re-download it if you already have it on your PC).
How to install G800FXXU1AOG2 Android 4.4.2 KK Firmware on Galaxy S5 Mini SM-G800F manually
- You must now entering the Download Mode, by turning off your phone then press these buttons; Volume Down + Home + Power.
- Release the buttons when your phone showing this warning, then use Volume Up to enter to the Download Mode.
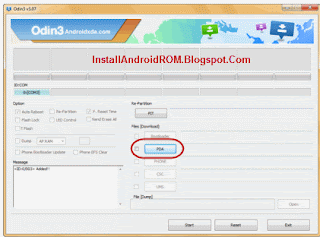
- Now open Odin you downloaded earlier to the computer.
- Plug your phone to computer now when Odin is running.
- Odin will identify your phone, then a notification saying Added!!! indicating that your phone is identified.
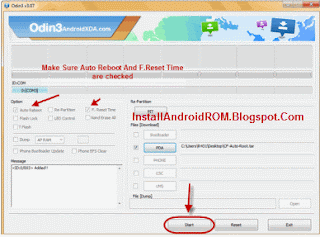
- Click AP (For Odin3 v3.09 or newer) or click PDA (For Odin3 v3.07) button then find the firmware file with .tar.md5 extension on your computer.
- Now press Start button to begin the installations of the firmware..
- PASS notification will come out, meaning that the firmware is flashed successfully to your smartphone.
- Reboot your phone.
Fix bootloop and other errors.Awesome my friend.
When you experience bootloop, what you need now is performing a factory reset / wipe data cache, done.


comment 0 comments:
more_vertsentiment_satisfied Emoticon