Advertisements.
The guides here can be applied to enable USB debugging mode on any Android versions.
Not only enabling the USB debugging mode, but today I would also like to invite you all to learn about Developer Options and how to activate it on your Android based devices.
Because activating Developer Options is required to disclose the USB debugging which in newer Android versions is hidden.
Every Android device owns either Developer Options and USB debugging. Yours too. So do you know what are they and how to activate them? Just learn about Developer Options and USB Debugging mode from this post.
What is developer options?
In newer Android versions such as KitKat and Lollipop, the Developer options is a hidden mode that need to be firstly activated before we can utilize everything within it.
And usually it's used by Android app developers to make test over their apps. Within the mode we are handed with plenty of options like one of which is USB debugging.
What is USB debugging mode?
USB debugging is an option within the Developer Options area that allows our Android phone to communicate with our computer, using a USB cable connected from our phone to computer.
Once it's connected then we can perform some actions such as rooting our Android, making backups, flashing a custom ROM, manually updating to a stock firmware, installing a custom recovery, also test and diagnose an app for a developer, etc.
Before root Android without PC become so popular, people used computer to root and of course they firstly need to set this option enabled in order to complete the root process.
How To Enable USB Debugging On All Android Versions.
For Android Jelly Bean, KitKat and Lollipop?
Several steps will be taken in order turn these options to on. On newer Android versions Google hides Developer Options from appearing. Thus we need to show the option first in order to enable the USB debugging mode.
Advertisements.
And to show the option we are required to do a several taps on the build number used by your phone to finally activate the Developer Options. The exact steps as follow.
- Go to Settings.
- Tap on About.
- Scroll down and find and tap on Build Number 7 times. (This action is needed to activate the Developer Options and USB debugging is inside that option).
- Then go back to Settings, there you will find a new option appears right above the About option which is Developer Options.
- Enter to Developer Options then scroll down, and find the USB Debugging, then check the box right beside it to enable it.
- A box will then appear asking you whether you want to Allow USB Debugging, just select ok / yes to confirm.
 |
| Click on the pictures above to enlarge the size. |
For Android 3.0-4.1.x or Android HoneyComb, Android Ice Cream Sandwich (ICS).
- You can simply go to Settings -> Developer Options or Developments. (set it to ON).
- Find USB Debugging inside the Developer Options.
- Then check the box right beside it to enable the USB Debugging mode.
 |
| Click the picture to have a bigger size. |
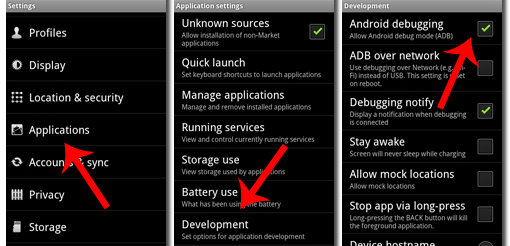
For Android 2.0-2.3.x or Android Eclair, Android Froyo and Android GingerBread.
- You need to go to Settings.
- Tap on Applications -> Developments.
- Then check the box beside USB debugging / Android debugging to enable it.
 |
| Click the picture to bigger size. |
Conclusions.
Well done, because you are now a developer that has set USB debugging mode enabled, from here you can perform several operations that mostly regarded as unofficial operations like rooting your device, flashing modified ROMs, and many more.
Be sure to disable USB debugging mode once you have done using it, or else your phone will be opened for outsider to access it to further performing operations without your notice. See you again in the next Install Android ROM posts.


comment 0 comments:
more_vertsentiment_satisfied Emoticon